
Next.js framework is trending among front-end developers. Built-in Server-Side Rendering (SSR) makes it easier to crawl the pages for search engines. More than any other features, Next.js can be considered a Full Stack framework. Here we are discussing the steps to connect MongoDB Atlas with a Next.js app.
Prerequisites
Before continuing this article, I assume that the reader is aware of the following technologies:-
- React.js library
- Next.js framework
- MongoDB
- MongoDB Atlas
What we will learn
After completing this article, we will learn to connect MongoDB Atlas with a Next.js app. We will also learn the following things:-
- What is MongoDB Atlas
- Creating a MongoDB Atlas Instance, Database, and Collections.
- Connecting the MongoDB Atlas Database with a Next.js app
Here we will create a Next.js app to show users’ data from the database. We also show the post data from the database and a form to insert posts into the database.
The below GIF will give you an idea about the app we are going to build.

What is MongoDB Atlas
MongoDB Atlas is a cloud database management system where, setting up, and managing databases are easier.
We all know that MongoDB is a document-oriented database. It needs a server to store these documents. We can use AWS, Google Cloud, Azure, etc. to set up a MongoDB server.
MongoDB Atlas makes these processes easier. We can create, deploy and manage databases easier with a graphical interface.

Create MongoDB Atlas cloud database
First, we are going to create a cloud database on MongoDB Atlas. It provides the easiest way to deploy, operate and scale MongoDB in the Cloud.
Let us discuss it step by step with screenshots and explanations.
Create an account on MongoDB Atlas
We need a MongoDB account for creating a database. So, log on to the MongoDB page and Sign Up for an account. Or we can simply create an account and log in using our Google account.

Setup our MongoDB account
After creating an account, we will see a page to enter our organization and project details. We will also get an option to choose our preferred programming language. Because we are using Node/ Express.js backend, we can choose JavaScript in this category.

Create a cluster
The word cluster may confuse you. It is actually a server where MongoDB stores our data. Choosing the right plan before creating a cluster is important. Let us discuss the plans first.
- Dedicated Multi-Cloud & Multi-Region Cluster – If we are developing a project for global users, then choosing this plan is great. Because it stores the data in dedicated servers located in multiple regions. This will increase the speed of our app.
- Dedicated Cluster – A dedicated cluster is a single server only dedicated to our organization/project. It can provide advanced performance.
- Shared Cluster – Shared Clusters are dedicated to a number of users. So it will affect the performance of our app in peak timings.
Because we are in development mode, Shared Cluster is ok for us. It is Free.

It will direct us to another page and from here, we can choose the Provider and Region, RAM, etc.
We can choose from AWS, Google Cloud, and Azure.
Because we are not choosing a paid plan, create a cluster with default settings that is free.

Create a collection
So the cluster is created and now we need to create a collection. We discussed that a cluster is a server for storing our project databases.
A collection is simply the collection of databases associated with each project we are going to create. A cluster can contain multiple collections.
So from the cluster, we created, click on the COLLECTIONS tab.

We will get an option to load a Sample Dataset and our own data. Choose to Add My Own Data from the options.

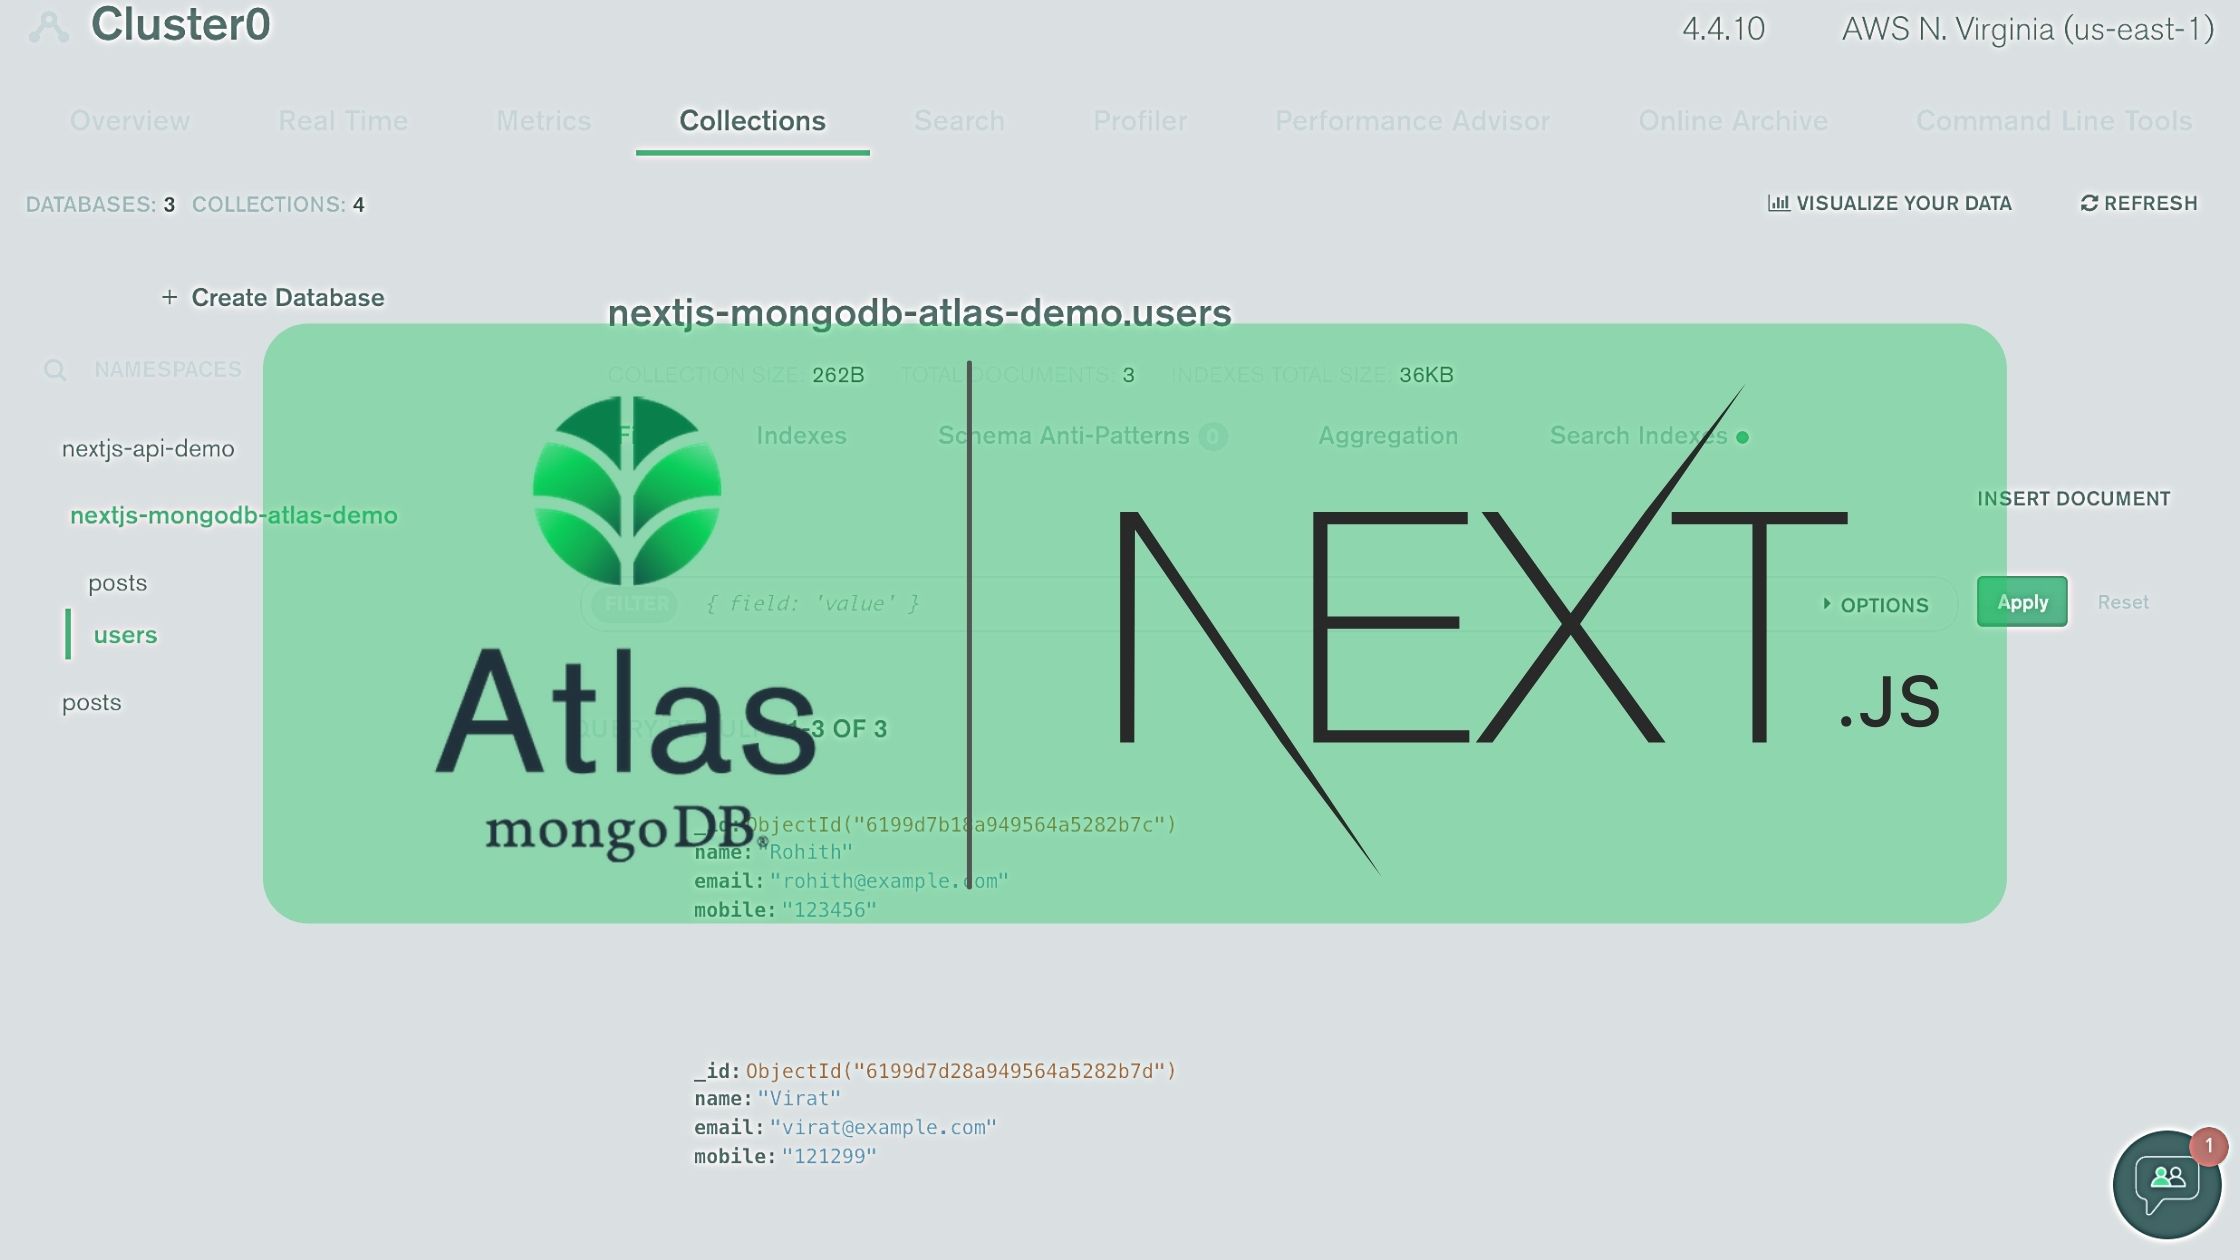
This will open up a modal for creating a database. I am giving nextjs-mongodb-atlas-demo as the database name and posts and collection name.

We also need to create a collection of users and add some data like name, email, mobile, etc.
So that the database and collections look the same as below.

Connect to the cluster
Now we can look for the steps to connect this database with our backend application. For this, we need a connection string.
Before getting a connection string, we need to complete some steps.
At the top-right, we can see a tab Cmd Line Tools. Click on it, and it will show us a page as below.
Click the Connect Instructions button.

It will display a view as below, where we should choose the option Connection your application.

For setting up the connection securely, we can set an IP address of the server where our backend is running. So that the request to the database can only be done from the server.
But in our case, we are developing our backend locally. So, let us choose, Add your current IP Address. So that we can use the database locally.
Note that, if a number of developers are accessing the DB from different IP addresses, Choosing the option Allow access from Anywhere is preferred.

Now we can create a database username and password. This data will be used in our connection string to maintain secure access.

At the next screen, we will get a connection string that can be added to the backend code for connecting the database with the backend.

Start a new Next.js project
After successfully installing Node.js on our system, we can easily create a new Next.js project using the below command.
npx create-next-app nextjs-mongodb-atlas-demo-app
This will create a new project named nextjs-mongodb-atlas-demo-app.

We can enter the directory and open the project with Visual Studio Code or any other code editor.
Note: We must install VS code on our system before executing the commands below.
cd nextjs-mongodb-atlas-demo-app
code .
This will open our Next.js project in VS code as shown below.

Setup a local environment variable
We need to add the copied connection string from MongoDB Atlas. It should be something like the one below.
MONGODB_URI= "mongodb+srv://techomoro123:[email protected]?retryWrites=true&w=majority"
Here, techomoro123 is the username and qk7ap0dFcwvYdo12 is the password. You have to replace it with yours.
Create a file named .env.local in our project and copy the contents to it.
MONGODB_URI= "mongodb+srv://techomoro123:[email protected]?retryWrites=true&w=majority"Note that we don’t specify the database name here. Because we will connect the database later.
Install MongoDB
We need to install the MongoDB package to work with MongoDB in a Next.js app. I think version 3.5.9 is more compatible. So we can install it.
npm i [email protected]Setup a MongoDB connection
Create a file named mongodb.js inside the lib directory. and add the code below to create a connection from our Next.js app to our MongoDB.
Note that we do not specify the database name here also. Because we will do it later.
// mongodb.js

import { MongoClient } from 'mongodb'

const uri = process.env.MONGODB_URI
const options = {
  useUnifiedTopology: true,
  useNewUrlParser: true,
}

let client
let clientPromise

if (!process.env.MONGODB_URI) {
  throw new Error('Please add your Mongo URI to .env.local')
}

if (process.env.NODE_ENV === 'development') {
  // In development mode, use a global variable so that the value
  // is preserved across module reloads caused by HMR (Hot Module Replacement).
  if (!global._mongoClientPromise) {
    client = new MongoClient(uri, options)
    global._mongoClientPromise = client.connect()
  }
  clientPromise = global._mongoClientPromise
} else {
  // In production mode, it's best to not use a global variable.
  client = new MongoClient(uri, options)
  clientPromise = client.connect()
}

// Export a module-scoped MongoClient promise. By doing this in a
// separate module, the client can be shared across functions.
export default clientPromise
2 methods to connect MongoDB to our Next.js app
We can access the MongoDB database from our Next.js app in two methods.
- Access to MongoDB from pages
- Creating API endpoints within Next.js
Method 1: Access to MongoDB from pages
Using the getServerSideProps lifecycle method, we can execute queries just before mounting a component.
The code inside this method is executed in the server with every request to the page. So that we can write database queries here without any security issues.
To do this, first import the clientPromise we created earlier in the mongodb.js file.
import clientPromise from "../lib/mongodb";Now inside getServerSideProps, select the database name and collection name.
We are specifying the database from here using client.db("nextjs-mongodb-atlas-demo").
Here in this example, we are getting the list of users from the database nextjs-mongodb-atlas-demo.
The data is first converted to an array and executed JSON.parse and JSON.stringify are to format it.
This data is injected into the props of the pages.
export async function getServerSideProps(context) {
const client = await clientPromise;
const db = client.db("nextjs-mongodb-atlas-demo");
let users = await db.collection("users").find({}).toArray();
users = JSON.parse(JSON.stringify(users));
return {
props: { users },
};
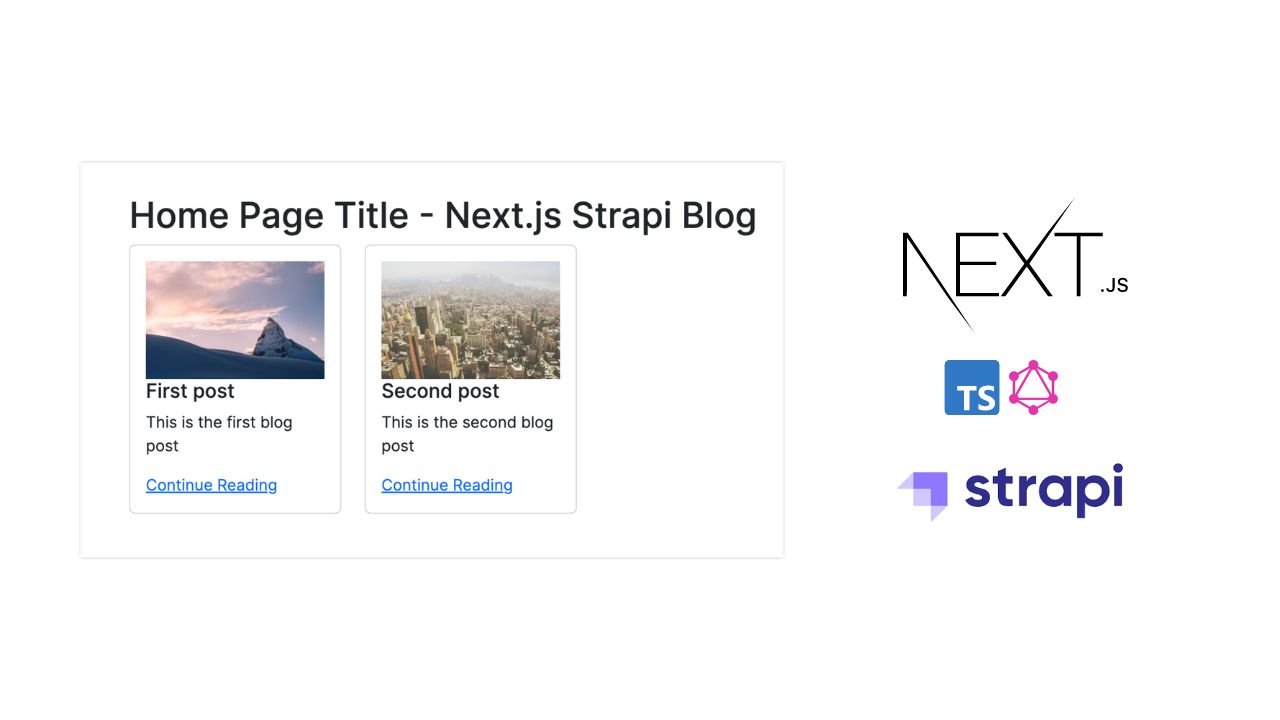
}We will map this user’s data and show it on the home page. The entire index.js file looks the same as below.
// pages/index.js

import clientPromise from "../lib/mongodb";

export default function Home({ users }) {
  return (
    <div className="container">
      <div>
        {users.map((user, index) => {
          return (
            <div className="card" key={index}>
              <h2>{user.name}</h2>
              <p>{user.email}</p>
              <p>{user.mobile}</p>
            </div>
          );
        })}
      </div>
    </div>
  );
}

export async function getServerSideProps(context) {
  const client = await clientPromise;

  const db = client.db("nextjs-mongodb-atlas-demo");

  let users = await db.collection("users").find({}).toArray();
  users = JSON.parse(JSON.stringify(users));

  return {
    props: { users },
  };
}
So that the homepage of our Next.js app looks the same as below.

Method 2: Create API endpoints and Access the MongoDB
One of the best features of the Next.js framework is that we can create API endpoints and access the database using it.
To do this, let’s first create a file named posts.js inside the pages/api directory. Inside a handler function, we can differentiate incoming request methods using the Switch method.
Here, we are defining two methods POST and GET to create posts and get the list of posts respectively.
// posts.js

import clientPromise from "../../lib/mongodb";

export default async function handler(req, res) {
  const client = await clientPromise;
  const db = client.db("nextjs-mongodb-atlas-demo");
  switch (req.method) {
    case "POST":
      let bodyObject = JSON.parse(req.body);
      let newPost = await db.collection("posts").insertOne(bodyObject);
      res.json(newPost.ops[0]);
      break;
    case "GET":
      const posts = await db.collection("posts").find({}).toArray();
      res.json({ status: 200, data: posts });
      break;
  }
}
Fetch the posts data by calling the API endpoint
Now we will get the data by calling the API endpoint we created. The below code makes a GET request to our API endpoints inside posts. It returns the posts data.
export async function getServerSideProps(context) {
  let res = await fetch("http://localhost:3000/api/posts", {
    method: "GET",
    headers: {
      "Content-Type": "application/json",
    },
  });
  let posts = await res.json();

  return {
    props: { posts },
  };
}
Create a post
We can also create a post by making a POST request to the API we created earlier.
useEffect(() => {
  setPostsState(posts);
}, [posts]);

let submitForm = async (e) => {
  setLoading(true);
  e.preventDefault();
  let res = await fetch("http://localhost:3000/api/posts", {
    method: "POST",
    body: JSON.stringify({
      title: title,
      content: content,
    }),
  });
  res = await res.json();
  setPostsState([...postsState, res]);
  setTitle("");
  setContent("");
  setLoading(false);
};
So that the complete posts.js file will be the same as below.
// pages/posts.js

import { useEffect, useState } from "react";

export default function Home({ posts }) {
  const [postsState, setPostsState] = useState([]);
  const [title, setTitle] = useState("");
  const [content, setContent] = useState("");
  const [loading, setLoading] = useState(false);

  useEffect(() => {
    setPostsState(posts);
  }, [posts]);

  let submitForm = async (e) => {
    setLoading(true);
    e.preventDefault();
    let res = await fetch("http://localhost:3000/api/posts", {
      method: "POST",
      body: JSON.stringify({
        title: title,
        content: content,
      }),
    });
    res = await res.json();
    setPostsState([...postsState, res]);
    setTitle("");
    setContent("");
    setLoading(false);
  };

  return (
    <div className="container">
      <div>
        <div>
          {postsState.map((post, index) => {
            return (
              <div className="card" key={index}>
                <h2>{post.title}</h2>
                <p>{post.content}</p>
              </div>
            );
          })}
        </div>

        <div className="add-form">
          <form onSubmit={submitForm}>
            <input
              type="text"
              name="title"
              placeholder="Title"
              value={title}
              onChange={(e) => setTitle(e.target.value)}
            />
            <textarea
              type="text"
              name="content"
              rows="10"
              placeholder="Content"
              value={content}
              onChange={(e) => setContent(e.target.value)}
            />
            <button type="submit" disabled={loading ? true : false}>
              {loading ? "Adding" : "Add"}
            </button>
          </form>
        </div>
      </div>
    </div>
  );
}

export async function getServerSideProps(context) {
  let res = await fetch("http://localhost:3000/api/posts", {
    method: "GET",
    headers: {
      "Content-Type": "application/json",
    },
  });
  let posts = await res.json();

  return {
    props: { posts },
  };
}
The posts page (http://localhost:3000/posts) works like the below.

Add some styles (out of topic)
For a better UI experience, we can add some styles to our code. So inside the styles/globals.css file, add the below code.
.container {
  display: flex;
  justify-content: center;
}
.card {
  box-shadow: 0 2px 5px 0 #dfdfdf, 0 8px 40px 0 rgb(10 14 29 / 6%);
  padding: 1rem;
  border-radius: 0.5rem;
  width: 20rem;
  height: auto;
  margin-top: 2rem;
}
.card h2 {
  font-size: 2em;
}

.card p {
  font-size: 1.5em;
}
form {
  margin-top: 2rem;
}
input,
textarea {
  width: 20rem;
  padding: 1rem;
  font-size: 1.2em;
  display: block;
  margin: 1rem 0;
  border-radius: 0.5rem;
}

button {
  width: 100%;
  height: auto;
  padding: 1rem;
  font-size: 1.2em;
  background: #505050;
  color: white;
  border: none;
  border-radius: 0.5rem;
  cursor: pointer;
}

button:hover {
  background: #292929;
}

@media only screen and (max-width: 600px) {
  .card {
    width: 95%;
  }
  input,
  textarea {
    width: 95%;
  }
}
Codesandbox
Refer to the CodeSandbox link to view the live app. You can also clone this project to your CodeSandbox account and edit the code.
https://codesandbox.io/s/elastic-heisenberg-gxjlw
GitHub
You can always refer to the GitHub repository to clone this project, refer to the code and work on top of it.
https://github.com/techomoro/nextjs-mongodb-atlas-demo-app
Summary
Here we have discussed the steps to connect MongoDB Atlas with a Next.js app. We also covered all the steps to create a database in MongoDB Atlas with screenshots.

I am getting an error: invalid hook call when doing your API method.
TypeError: Cannot read properties of undefined (reading ‘map’) getting this error when I am trying to map postState..
Can you please share your Git repository?