
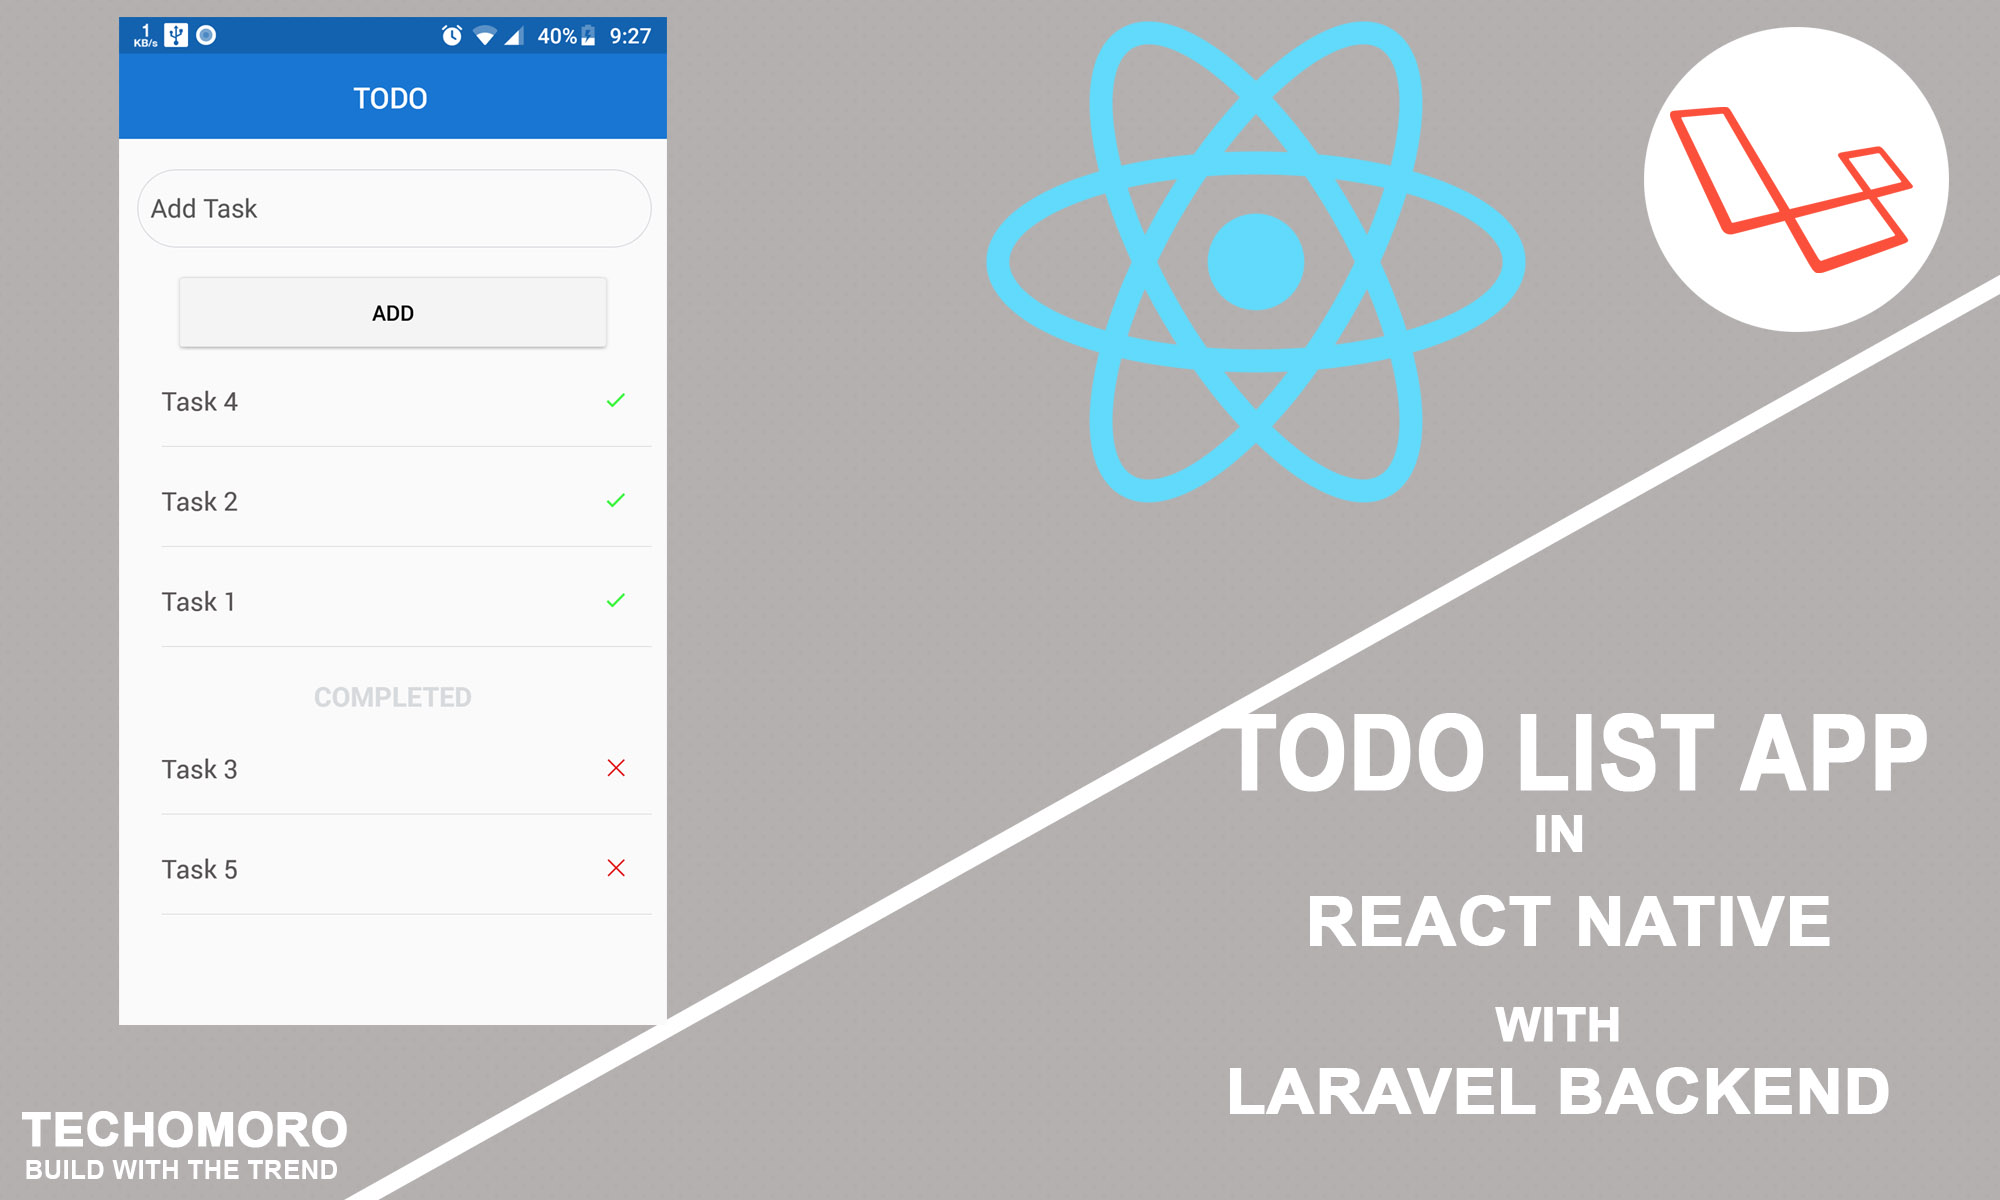
React Native is one of the powerful and popular mobile application development frameworks. We can build interactive cross-platform mobile applications that support both iOS and Android easily using it. Another trending technology nowadays is Laravel, a free open-source PHP framework. It is a great framework based on the Model View Controller(MVC) architectural pattern and is one of the common using backend technology. So, here we are going to build a React Native application with the support of Laravel backend.
Before starting the coding part, let us have a look at some features and benefits of React Native. Using React Native, we can compose a rich mobile UI from declarative components. Declarative components are those which can be reused when building an app. Another advantage of choosing React Native for mobile application development is that it lets us build mobile applications using only JavaScript. Yes, We don’t need to learn Java or Kotlin to build Android apps, and Swift to build iOS apps. React Native empowers building apps for both platforms with just JavaScript.
Now coming to Laravel, it is a free open source PHP framework and the simple and powerful technology based on Model View Controller(MVC) architectural pattern. It is one of the most using backend frameworks nowadays. That’s it. Now I am going to create a Todo list application for the Android platform using React Native framework. The backend technology I am using here is Level 5.6.
The best practice for starting with a project having both backend and frontend is that first create a backend and then a frontend on top of it.
- Create a Backend using Laravel
- Build a React Native frontend
Backend(Laravel)
1.Install and Setup Laravel
I am not wasting any time explaining about installing and setting up of Laravel on your system because I included the link containing all the procedures for the installation. But note that you have to change the project name AwesomeProject to LaravelBackend (Step 5) and also, the database name you are giving on step 9 has to be tasks-db. Because in this tutorial, I am using those details. It is not mandatory for you to follow my naming systems. You can choose your own. In that case, you have to use them in the upcoming steps too.
https://www.techomoro.com/how-to-install-and-setup-laravel-5-6-on-ubuntu-17-10
2. Create a Model with Migration, and Controller
As we already discussed, Laravel is a Model View Controller(MVC) framework. It means that an application made using Laravel must contain 3 sections.
- A database section and a model– to manage each of the databases.
- A Controller section– associated with each of the models created.
- A View section– to render the views.
Now we need to create a model and also the migration and controller associated with it. This can be simply done using a single command.
php artisan make:model Task -mc
Here Task is the model name and -mc will create a migration and a controller for the model created.
The above command creates 3 files, Task.php inside app directory, TaskController.php inside app/Http/Controllers directory and *_create_tasks_table.php in database/migrations directory.
3. Edit the Database Schema
The database schema associated with the model we have created is *_create_tasks_table.php inside your database/migrations directory. Open it and you can see the code snippet below in it.
$table->increments(‘id’); // stores the id for each row.
$table->timestamps(); // stores created_at and updated_at details of each row.
We need to add two columns to the database.
$table->string(“task”); // to store task names.$table->boolean(“iscompleted”); // to store whether the task is completed or not.
Now the *_create_tasks_table.php file will be like below.
<?php

use Illuminate\Support\Facades\Schema;
use Illuminate\Database\Schema\Blueprint;
use Illuminate\Database\Migrations\Migration;

class CreateTasksTable extends Migration
{
/**
* Run the migrations.
*
* @return void
*/
public function up()
{
Schema::create('tasks', function (Blueprint $table) {
$table->increments('id');
$table->timestamps();
$table->string("task");
$table->boolean("iscompleted");
});
}

/**
* Reverse the migrations.
*
* @return void
*/
public function down()
{
Schema::dropIfExists('tasks');
}
}
4. Migrate the database
We set up a database and schema in the previous steps and it needs to be migrated to MySQL in localhost. For this,
php artisan migrate
5. Edit Controller
Controller section handles the functions of our Laravel application. So, it needs to edit the controller TaskController.php we made to define the functions of our app.
At first import Task model from App directory.
use App\Task
And inside TaskController class, define an index() function as below.
public function index()
{
$tasks = Task::where("iscompleted", false)->orderBy("id", "DEC")->get();
$c_tasks = Task::where("iscompleted", true)->get();
return response()->json([
'tasks' => $tasks,
'c_tasks' => $c_tasks
]);
}
This function returns the variable tasks and c_tasks with incomplete and completed tasks data respectively. Let us know about this function deeply.
The Task is the model we created before and is connected to the tasks table in the database. So in the first step of the function, $task stores the tasks we added to the tasks table where iscompleted column = false. This will be in descending order of their ids. Similarly $c_tasks stores tasks where is completed column = true. After that, both the variables will be returned as a JSON object.
After index() function, define store() function as below.
public function store(Request $request)
{
$task = Task::create($request->all());
return response()->json([
"code" => 200,
"message" => "Task added successfully"
]);
}
store() function stores the values we post. $request contains the data we post and this data is stored in the tasks table by creating a row. After that, a JSON response is returned to the frontend with code and message.
Now, define complete() function like below.
public function complete($id)
{
$task = Task::find($id);
$task->iscompleted = true;
$task->save();
return response()->json([
"code" => 200,
"message" => "Task listed as completed"
]);
}
It takes the row containing id as same as $id in function parameter, changes its is completed column value from false to true and saves .after that it returns a JSON response with success message.
Now we have a destroy() function which deletes the task and return the JSON response with a success message.
public function destroy($id)
{
$task = Task::find($id);
$task = $task->delete();
return response()->json([
"code" => 200,
"message" => "Task deleted successfully"
]);
}
So, the complete TaskController.php file will look like as below.
<?php
namespace App\Http\Controllers;
use Illuminate\Http\Request;
use App\Task;

class TaskController extends Controller
 {
  public function index()
  {
    $tasks = Task::where("iscompleted", false)->orderBy("id", "DEC")->get();
    $c_tasks = Task::where("iscompleted", true)->get();
    return response()->json([
     'tasks' => $tasks,
     'c_tasks' => $c_tasks
    ]);
  }
  public function store(Request $request)
   {
    $task = Task::create($request->all());
    return response()->json([
     "code" => 200,
     "message" => "Task added successfully"
    ]);
  }
  public function complete($id)
  {
    $task = Task::find($id);
    $task->iscompleted = true;
    $task->save();
    return response()->json([
     "code" => 200,
     "message" => "Task listed as completed"
    ]);
  }
  public function destroy($id)
  {
    $task = Task::find($id);
    $task = $task->delete();
    return response()->json([
    "code" => 200,
    "message" => "Task deleted successfully"
   ]);
 }
}
6. Edit API.php
This is the last step in setting up the backend of this application. edit the routes/api.php file contents with the below code. Here, we are making API links which are used to handle the controller functions in the backend from frontend.
<?php
Route::get("tasks", "TaskController@index");
Route::post("task", "TaskController@store");
Route::get("task/{id}/complete", "TaskController@complete");
Route::get("task/{id}/delete", "TaskController@destroy");
The id in the links above is passed to the controller function as the function parameter.
Frontend(React Native)
1. Install and Setup React Native
I already made a tutorial on installing and setting up of React Native. You can see it from the link below. But note that you have to change the project name AwesomeProject to ReactnativeTodo (Step 9). Because in this tutorial, I am using that name. But as I told, It is not mandatory for you to follow my naming systems. You can choose your own. In that case, you have to use them in the upcoming steps too.
https://www.techomoro.com/how-to-install-and-setup-react-native-on-ubuntu-17-10
2. Install Nativebase
Nativebase is a node package which allows you to use some UI components for React Native. If you can build your UI components using Flexbox, or you are using any other packages to setup UI, then this step is not mandatory for you.
npm install native-base --save
react-native link
3. Edit App.js
The index.js file is executed first in React Native. As a default, the App.js file is imported to the index. So The code inside App.js is executed. The rendered view you are seeing first time on your device is coming from this file. We are going to edit this.
First, import all components from their locations/ libraries. Some of the components I imported from native-base are also available in the react-native library. I imported them from native-base because they are pre-styled and it saves a lot of time.
import React, { Component } from "react";
import { TouchableOpacity } from 'react-native';
import { Container, Header, Content, List, ListItem, Text, Left, Body, Title, Item, Input, Right, Icon, Button } from "native-base";
Now add a class named App and export it.
export default class App extends Component {
}
Inside this class, define a constructor function and declare all the states we need to store our data. The state task is to store the task name we add with input field from our frontend. tasks state is to store the incomplete tasks, the c_tasks state is to store completed tasks
constructor(props) {
super(props);
this.state= {
task:null,
tasks: [],
c_tasks: [],
};
}
Now it needs the code for fetching the tasks data from our backend. This is done inside componentDidMount() . But we need to get the data from our backend every 1000 milliseconds. Because after we add a new task, it is saved in the backend and it needs to be shown in the frontend by fetching it. So we made a time interval of 1000 milliseconds using setInterval() function and every 1000 milliseconds the getTasks() function is called. So getTasks() function fetches the tasks from backend in every 1000 milliseconds.
The fetched object contain tasks and c_tasks. These are stored in the states we already created.
componentDidMount() {
  this.timer=setInterval(() =>this.getTasks(), 1000);
}

async getTasks() {
  return fetch("http://192.168.42.177/LaravelBackend/public/api/tasks")
  .then(response => response.json())
  .then(responseJson => {
  this.setState({
  tasks:responseJson.tasks,
  c_tasks:responseJson.c_tasks
}, function() {
    //comment
   });
})
.catch(error => {
null;
});
}
On the above code, I have bolded an IP address. This is the Private IP of my computer system. It directs to the localhost of my system ( var/www/html directory) where my Laravel backend is located.
You have to use our private IP instead of mine.
Some of you must have a question of using,
http://localhost/LaravelBackend/public/api/tasks or http://127.0.0.1/LaravelBackend/public/api/tasks inside the fetch()
The answer is, Unfortunately, it is not working !!!
To get your private IP,
On Terminal,
hostname -I
This gives your private IP and put it inside the code above.
The next function we are going to add is, addTask() which posts the data task to the backend. The state task will be null until we input the task from our app. It also contains a function this.input._root.clear() which clears the input field after the post function.
addTask= () => {
fetch('http://192.168.42.177/LaravelBackend/public/api/task', {
method:'POST',
headers: {
Accept:'application/json',
'Content-Type':'application/json',
},
body:JSON.stringify({
"task":this.state.task,
}),
})
.then((response) => response.json())
.then((responseData) => {
"POST Response",
"Response Body -> "+JSON.stringify(responseData)
})
.done();
this.input._root.clear();
};
Now add a function completeTask() which performs complete() function in backend.
completeTask = (id) => {
fetch(`http://192.168.42.177/LaravelBackend/public/api/task/${id}/complete`)
.done();
};
also the deleteTask() function which performs destroy() function in backend.
Now it’s time for the render function which renders the view of our mobile app. I just used Nativebase UI components for easiness. You can use UI components from react-native if you need it.
render() {
return (
<Container>
<Header>
<Body>
<Title>Todo</Title>
</Body>
</Header>
<Content>
<Itemrounded>
<Inputplaceholder="Add Task"
onChangeText={input=>this.setState({ task:input })}
ref={(ref) => { this.input = ref }}
/>
</Item>
<ButtonblocklightonPress={ () =>this.addTask() }>
<Text>Add</Text>
</Button>
<List
dataArray={this.state.tasks}
renderRow={item=> (
<ListItem>
<Left>
<Text>{item.task}</Text>
</Left>
<Right>
<TouchableOpacity onPress={ () => {this.completeTask(item.id)} }>
<Iconname="ios-checkmark"/>
</TouchableOpacity>
</Right>
</ListItem>
)}
/>
<Text>COMPLETED</Text>
<List
dataArray={this.state.c_tasks}
renderRow={item=> (
<ListItem>
<Left>
<Text>{item.task}</Text>
</Left>
<Right>
<TouchableOpacity onPress={ () => {this.deleteTask(item.id)} }>
<Iconname="ios-close"/>
</TouchableOpacity>
</Right>
</ListItem>
)}
/>
</Content>
</Container>
);
}
Here I am not explaining all UI components. But some of them needs an explanation.
<Inputplaceholder="Add Task" onChangeText={input=>this.setState({ task:input })} ref={(ref) => { this.input = ref }} />
This is the input field for task addition. when the started typing in this field, the value of the state task is changed to the input value.
ref={(ref) => { this.input = ref }} – This is added inside input tag to clear the current value in input field after posting it to backend.
Now, A button is added to call addTask() function
<Button block light onPress={ () =>this.addTask() }>
  <Text>Add</Text>
</Button>
The states tasks and c_tasks need to iterate and display on the screen. This code for this is shown below.
<List
dataArray={this.state.tasks}
renderRow={item=> (
<ListItem>
<Left>
<Text>{item.task}</Text>
</Left>
<Right>
<TouchableOpacity onPress={ () => {this.completeTask(item.id)} }>
<Iconname="ios-checkmark"/>
</TouchableOpacity>
</Right>
</ListItem>
)}
/>
<List
dataArray={this.state.c_tasks}
renderRow={item=> (
<ListItem>
<Left>
<Text>{item.task}</Text>
</Left>
<Right>
<TouchableOpacity onPress={ () => {this.deleteTask(item.id)} }>
<Iconname="ios-close"/>
</TouchableOpacity>
</Right>
</ListItem>
)}
/>
complete() or delete() functions are called with id as the function parameter if the right side icons are pressed for each task.
Now the Todo list app is ready. If you need a signed APK of your app, just follow the steps in the link below.
https://www.techomoro.com/how-to-generate-signed-apk-in-react-native
GitHub
The complete project I created is uploaded in GitHub and you can always refer it. The app in the Github repository is more stylized and I also added some extra functions to it.
Backend
https://github.com/syamjayaraj/SimpleReactNativeLaravelTodoAppBackend
Frontend
https://github.com/syamjayaraj/SimpleReactNativeLaravelTodoAppFrontend
Have a nice code !


Be the first to reply