
React bootstrap with material design(MDB React) is one of the best packages for building web applications. It is built with React and Bootstrap 4. All compatible with different browsers. But when I tried using the MDBDataTable component of this package, I got many problems. So here in this article, I am sharing the ways to render HTML contents and action buttons in React MDBDataTable.
Prerequisites
To follow this article, the reader should be aware of the following technologies:-
- JavaScript ES6
- React.js library
- Using Bootstrap in a React app
- Working with Hooks in React
- Using fetch in React
What we will learn
In this article, we will learn the following things:-
- To Create a React project
- Adding Bootstrap CDN in our app
- Using third-party APIs using fetch
- Rendering HTML contents and action buttons in React MDBDataTable component
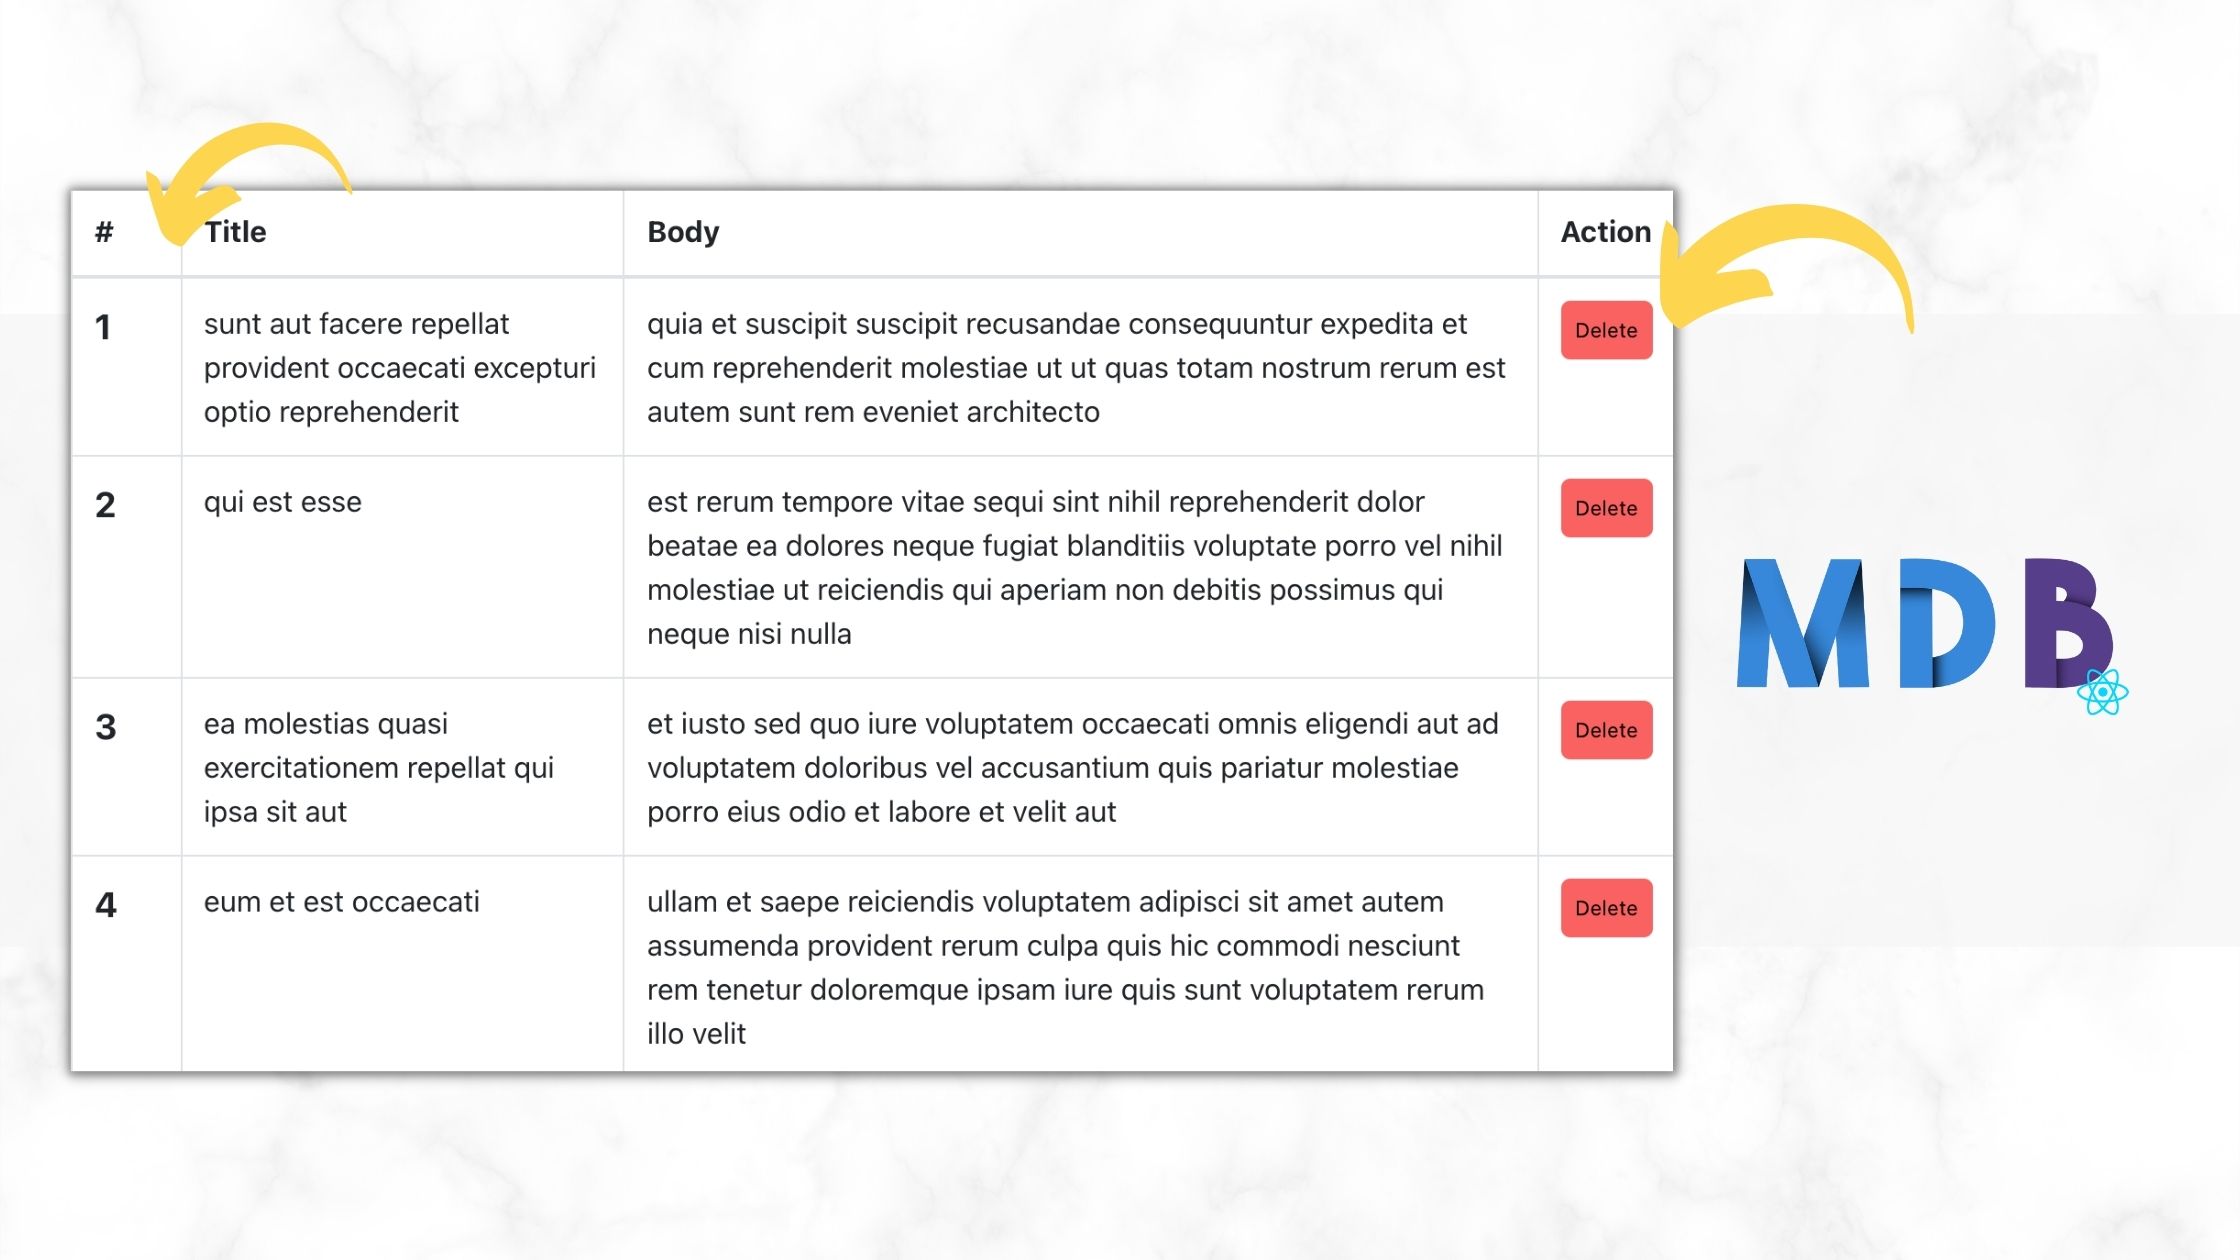
We will fetch some dummy blog posts from a placeholder API and render them inside the MDBDataTable with a Delete button for each row.
Clicking the delete button will delete the rows from the table.
The workflow of the app we are creating will look the same as below.

Create a new React project
The first step is setting up a React application on your system. This can be easily done using the NPX tool.
So, install Node.js on your system first and create a react application using NPX. Don’t bother about the term NPX, because it’s a tool coming with NPM(Node Package Manager) 5.2+ onwards which will install on your system with Node.js itself.
If you need further assistance in the installation of React on your system, use the below links.
Install React on Windows, Ubuntu, and macOS
npx create-react-app action-buttons-react-mdbdatatable
This command will create a react application with the project name action-buttons-react-mdbdatatable
Now enter the project directory and start the app.
cd action-buttons-react-mdbdatatable
npm start
It will open up the React application we have created in our browser window with the address https://localhost:3000. The port may vary if 3000 is busy.

Now we can use our favorite code editor to edit our project. I personally recommend Visual Studio Code.
Add the Bootstsrap CDN
We need Bootstrap CSS when working with MDB React. It’s better to use packages like react-bootstrap to integrate bootstrap with our React application. But here, we are using the Boostrap CDN that makes the process easier.
So open the index.html and inside the header tag, add the bootstrap CDN.
<header>
    <link rel="stylesheet" href="https://maxcdn.bootstrapcdn.com/bootstrap/4.0.0/css/bootstrap.min.css" integrity="sha384-Gn5384xqQ1aoWXA+058RXPxPg6fy4IWvTNh0E263XmFcJlSAwiGgFAW/dAiS6JXm" crossorigin="anonymous">
...
</header>
So that the entire index.html will look the same as below.
Fetch the posts data
Here we are using a placeholder API to get the list of some example posts data. We will render this data inside the MDB React table.
A GET request to the below API URL will return the list of posts.
https://jsonplaceholder.typicode.com/posts
So inside the useEffect hook, call the API and store the response in posts state.
  useEffect(() => {
    fetch("https://jsonplaceholder.typicode.com/posts")
      .then((res) => res.json())
      .then((res) => {
        setPosts(res);
      });
  }, []);
Define the delete post function
We need to define the function deletePost that executes when clicking the delete button in each row.
A DELETE request to the below API URL with id as the parameter will delete the post.
https://jsonplaceholder.typicode.com/posts/[id]
Note that in our placeholder API, nothing will happen with this request. We have to remove the item from the posts array after getting the response from this API.
Refreshing the page will return the data again as the response.
  let deletePost = (postId) => {
    fetch(`https://jsonplaceholder.typicode.com/posts/${postId}`, {
      method: "DELETE",
    })
      .then((res) => res.json())
      .then((res) => {
        var postIndex = posts.findIndex(function (o) {
          return o.id === postId;
        });
        if (postIndex !== -1) {
          setPosts(posts.filter((item) => item.id != postId));
        }
      });
  };
Render the action buttons column and HTML contents
We are setting the list of posts in a state called posts. With the change in this state, we need to render the action buttons and HTML contents.
Note that, do not work on the state directly. stringify and parse the posts state and assign it to a temporary variable and then define the HTML contents and action column inside it.
Here, in our example, we are styling the id before rendering it which I have shown below.
item.id = (
        <div style={{ fontWeight: "bold", fontSize: "1.2em" }}>{item.id}</div>
      );
Now let us define the action column. Here we can add Edit, View, and Delete buttons. Here in this example, I am only adding a delete button. Clicking the Delete button will call the deletePost function that we defined earlier.
     item.action = (
        <div style={{ display: "flex", justifyContent: "space-between" }}>
          <div
            className="uil-trash-alt"
            style={{
              cursor: "pointer",
              color: "black",
              fontSize: ".7em",
              padding: ".5rem",
              borderRadius: ".3rem",
              background: "#fb6262",
            }}
            onClick={() => deletePost(posts[index].id)}
          >
            Delete
          </div>
        </div>
      );
Other values should be rendered directly. So, we will set the modified data to a state called usersForRender.
This state is shown inside the table. Below, we can see the entire useEffect hook with these functions.
  useEffect(() => {
    let postsArray = JSON.parse(JSON.stringify(posts));
    let userData = [];
    postsArray.map((item, index) => {
      item.id = (
        <div style={{ fontWeight: "bold", fontSize: "1.2em" }}>{item.id}</div>
      );
      item.action = (
        <div style={{ display: "flex", justifyContent: "space-between" }}>
          <div
            className="uil-trash-alt"
            style={{
              cursor: "pointer",
              color: "black",
              fontSize: ".7em",
              padding: ".5rem",
              borderRadius: ".3rem",
              background: "#fb6262",
            }}
            onClick={() => deletePost(posts[index].id)}
          >
            Delete
          </div>
        </div>
      );
      userData.push(item);
    });
    setUsersForRender(userData);
  }, [posts]);
Set the Table Headers and field values and rows
We can set the table headers next and the field values to be shown in each header column. We need to add the rows here that were defined earlier.
  const data = {
    columns: [
      {
        label: "#",
        field: "id",
        sort: "asc",
        width: 150,
      },
      {
        label: "Title",
        field: "title",
        sort: "asc",
        width: 270,
      },

      {
        label: "Body",
        field: "body",
        sort: "asc",
        width: 200,
      },
      {
        label: "Action",
        field: "action",
        width: 100,
      },
    ],

    rows: usersForRender,
  };
Render the MDBDataTable component
Now at the end, we need to code the MDBDataTable component for rendering the table.
  return (
    <div className="App">
      <MDBDataTable
        responsive
        bordered
        data={data}
        searching={false}
        paging={false}
        info={false}
      />
    </div>
So that the entire App component will be the same as below.
Codesandbox
Refer to the CodeSandbox link to view the live app. You can clone this project to your CodeSandbox account and edit the code also.
https://codesandbox.io/s/gracious-lamport-k78v2
GitHub
You can always refer to the GitHub repository to clone this project, refer to the code and work on top of it.
https://github.com/techomoro/action-buttons-react-mdbdatatable
Summary
Here in this article, we learned the steps to render the HTML contents and action buttons inside a React MDBDataTable. We used a placeholder API to fetch some dummy blog posts and delete displayed them on the MDBDataTable including a Delete button column. Then we code a function to delete the row.
Be the first to reply