
The popularity graph of PHP is getting poor nowadays. Developers are in love with technologies such as Nodejs, Python, etc. But we couldn’t neglect that WordPress, a Content Management System(CMS) platform written in PHP is still the topper by powering over 30% of the whole websites. So creating a React app on top of WordPress REST API is a better choice nowadays.
Advantages of building frontend with React.js
React is a JavaScript library for building user interfaces. It is maintained by Facebook and a community of individual developers and companies.
React can be used as a base in the development of single-page or mobile applications. It lets us compose complex UIs from small and isolated pieces of code called “components”.
If we are familiar with React, we can also build cross-platform mobile applications supporting both Android and iOS platforms using the React Native framework.
Why WordPress?
I know some of you may ask what is the advantage of making this connection between WordPress and React. Because, a lot of frameworks are there to create backends such as Express.js, Laravel, etc.
The answer for this question is, the same I emphasized in the first paragraph of this article. 30% of the whole website in the web are still made using WordPress. It contains a lot of blogs, business websites etc.
So, Beyond switching to a new admin panel by migrating old data to a new one, it’s better to look for
HTTP Methods for RESTful APIs
I assume that you have a basic knowledge about CRUD(Create, Read, Update and Delete) operations.
In simple words, the to get data from a REST API, we use the GET method. For creating a document, we use POST request. PUT and DELETE methods are used to update and delete documents from the database.
The HTTP Methods for RESTful APIs are explained below and you can refer it. These methods can be used to access the data from a WordPress blog and and update it.
| HTTP METHOD | CRUD |
| GET | Read |
| POST | Create |
| PUT | Update/Replace |
| PATCH | Partial Update/Modify |
| DELETE | Delete |
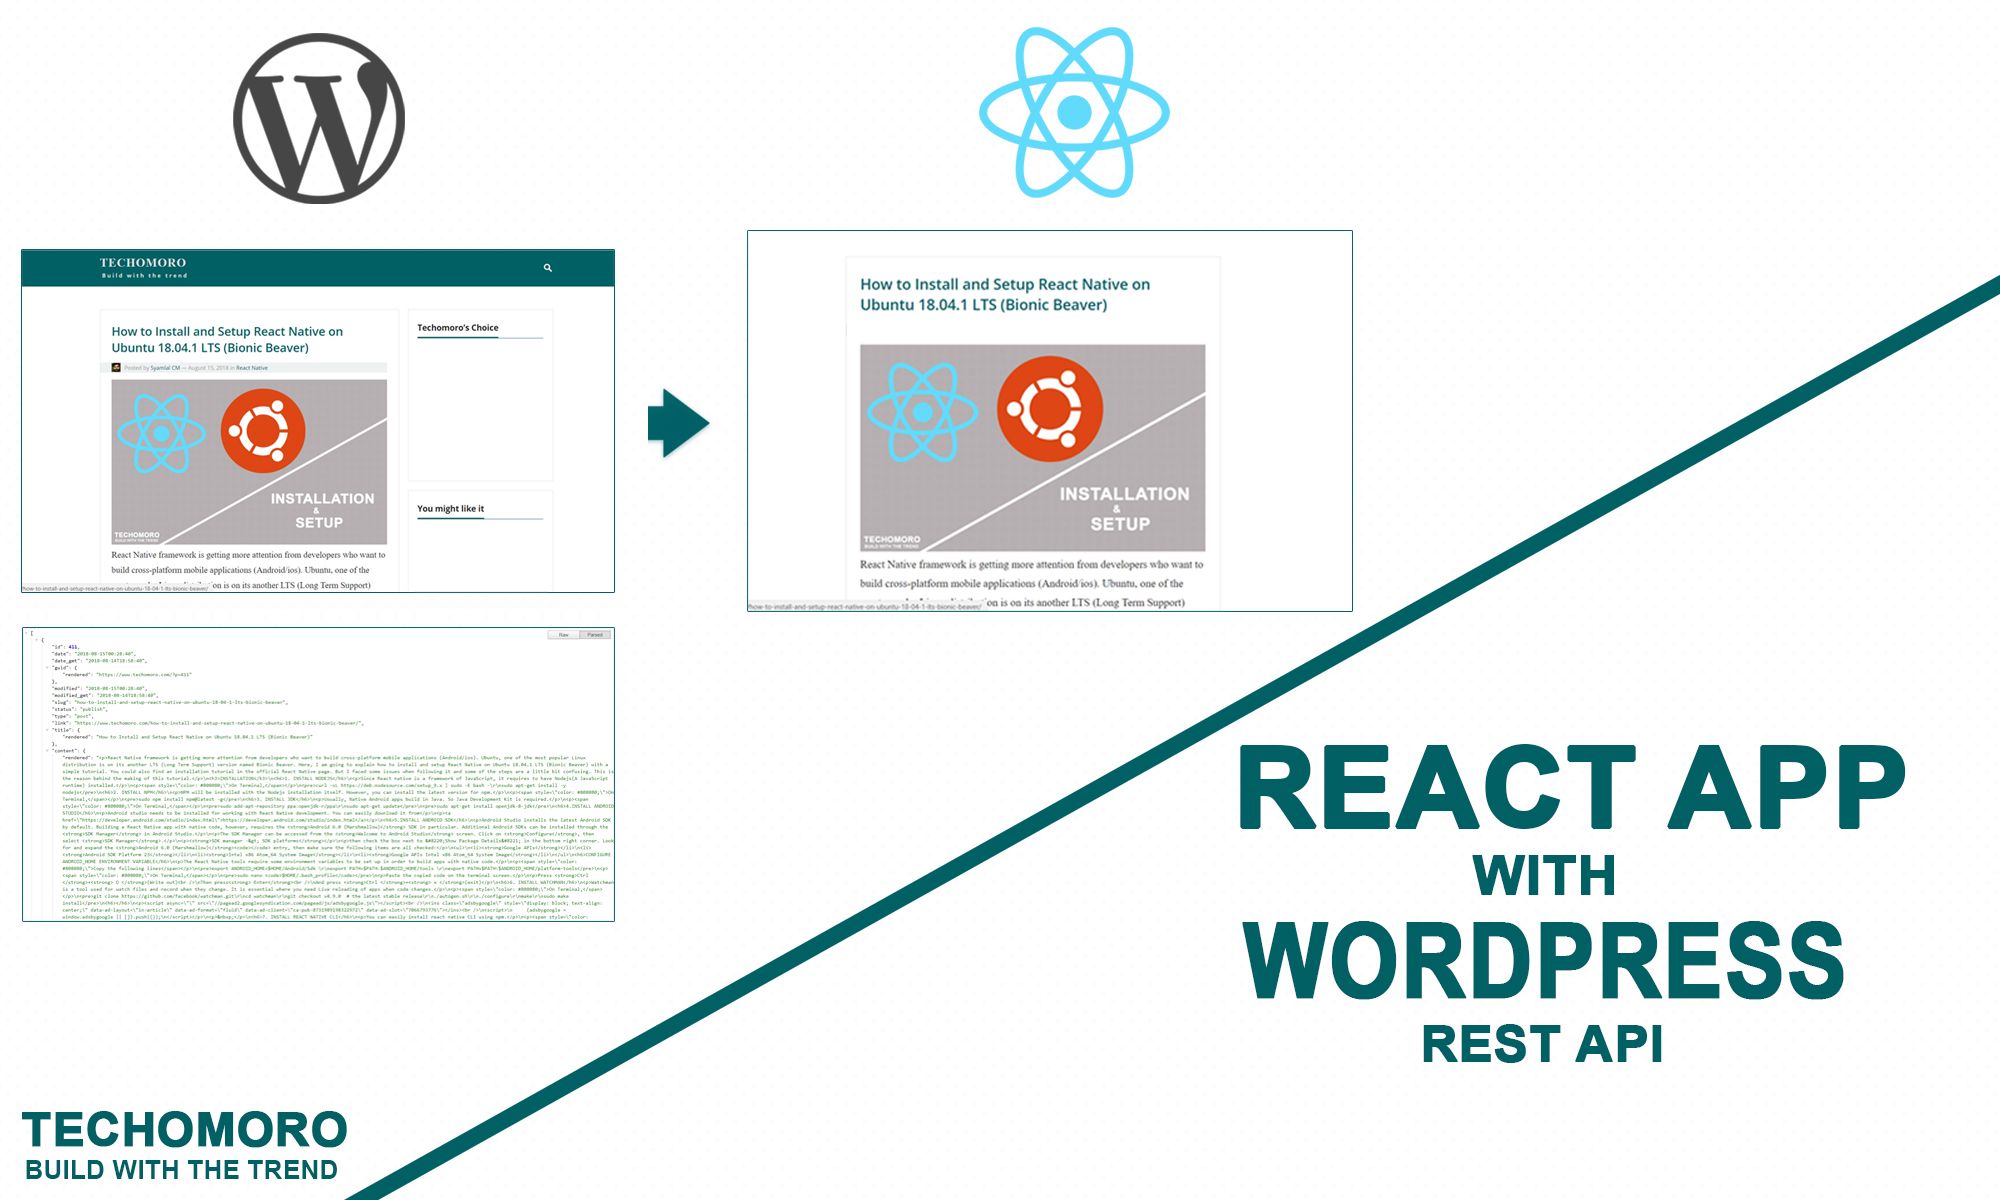
Create a React App on top of the WordPress REST API
Here we are going to create a React app with WordPress JSON API. Common WordPress knowledge is essential to follow this tutorial.
If we already installed a WordPress website or blog in our local system, we used the host name as http://localhost/.
But in this article, I am using https://www.techomoro.com/ as the host name.
Here in this article, we are only testing GET requests and so, just browser is needed for testing. But we need another tools to test POST, PUT, and DELETE, requests.
Here in this article, I am using POSTMAN tool for testing the APIs.
GET all posts from a WordPress blog
So, with the below URL, we can get all the posts from Techomoro.com in JSON format.
https://techomoro.com/wp-json/wp/v2/posts/

GET a single post from a WordPress blog
We can see an id field with all the posts in the above response. Using this id, we can sort out the data of each post in our blog.
So, using the below URL, we get JSON data of the post with id 1 from the blog.
https://techomoro.com/wp-json/wp/v2/posts/1
We can access the users, comments, media data etc. in this manner and can also perform RESTful services.
Create a new react app
The first step is setting up a React application on your system. This can be easily done using NPX tool.
So, install Node.js on your system first and create a react application using NPX. Don’t bother about the term NPX, because it’s a tool coming with NPM(Node Package Manager) 5.2+ onwards which will install on your system with Node.js itself.
If you need further assistance in the installation of React on your system, use the below links.
Install React on Windows, Ubuntu, and macOS
npx create-react-app simple-app
This command will create a react application with the project name simple-app.
Now enter the project directory and start the app.
cd simple-app
npm start


If everything goes well, it should be able to serve the newly created application on the development server at
http://localhost:3000/
1. Declare state to store the posts after fetch
Now we need to start working on our React app. We can start from App.js file inside src directory.
We have to declare a state named posts as array type inside the constructor.
2. Fetch the posts
Then fetch all the posts data from our WordPress blog using the API https://techomoro.com/wp-json/wp/v2/posts/.
This has to be loaded immediately after the component mounts. So declare a componentDidMount() and send a GET request to our blog using fetch. This will return a JSON data and it will be stored in an array posts that we declared in previous step.
3. Display the posts on screen
Now can map the data in posts array and show each in side an HTML block.
For a blog post, it basically contain a title section and content section. WordPress API returns the content in HTML format.
So we can directly render the content section of a post in react page using dangerouslySetInnerHTML.
4. Add some style
I also adding some CSS in App.css located inside src directory.
So our react application is ready with a WordPress REST API support.
Now, if we change the contents from WordPress admin dashboard, it will change the contents in our react app.
Also, if we integrate the POST and PUT APIs in our app, we can change our blog contents from our React frontend app.
GitHub
You can always refer to the GitHub repository to clone the project we have created.
https://github.com/techomoro/ReactWordPress
Summary
So in this article, we learnt about React.js library, WordPress REST API, and the steps to create a simple react app on top of WordPress REST API.
The React app we have made in this article uses only GET requests. We can also integrate POST and PUT requests in case of a real world application.
Every weekend i used to go to see this web site, for the reason that i wish for enjoyment, as this this web
site conations really good funny information too.
This information is really helpful… Genuine content.