
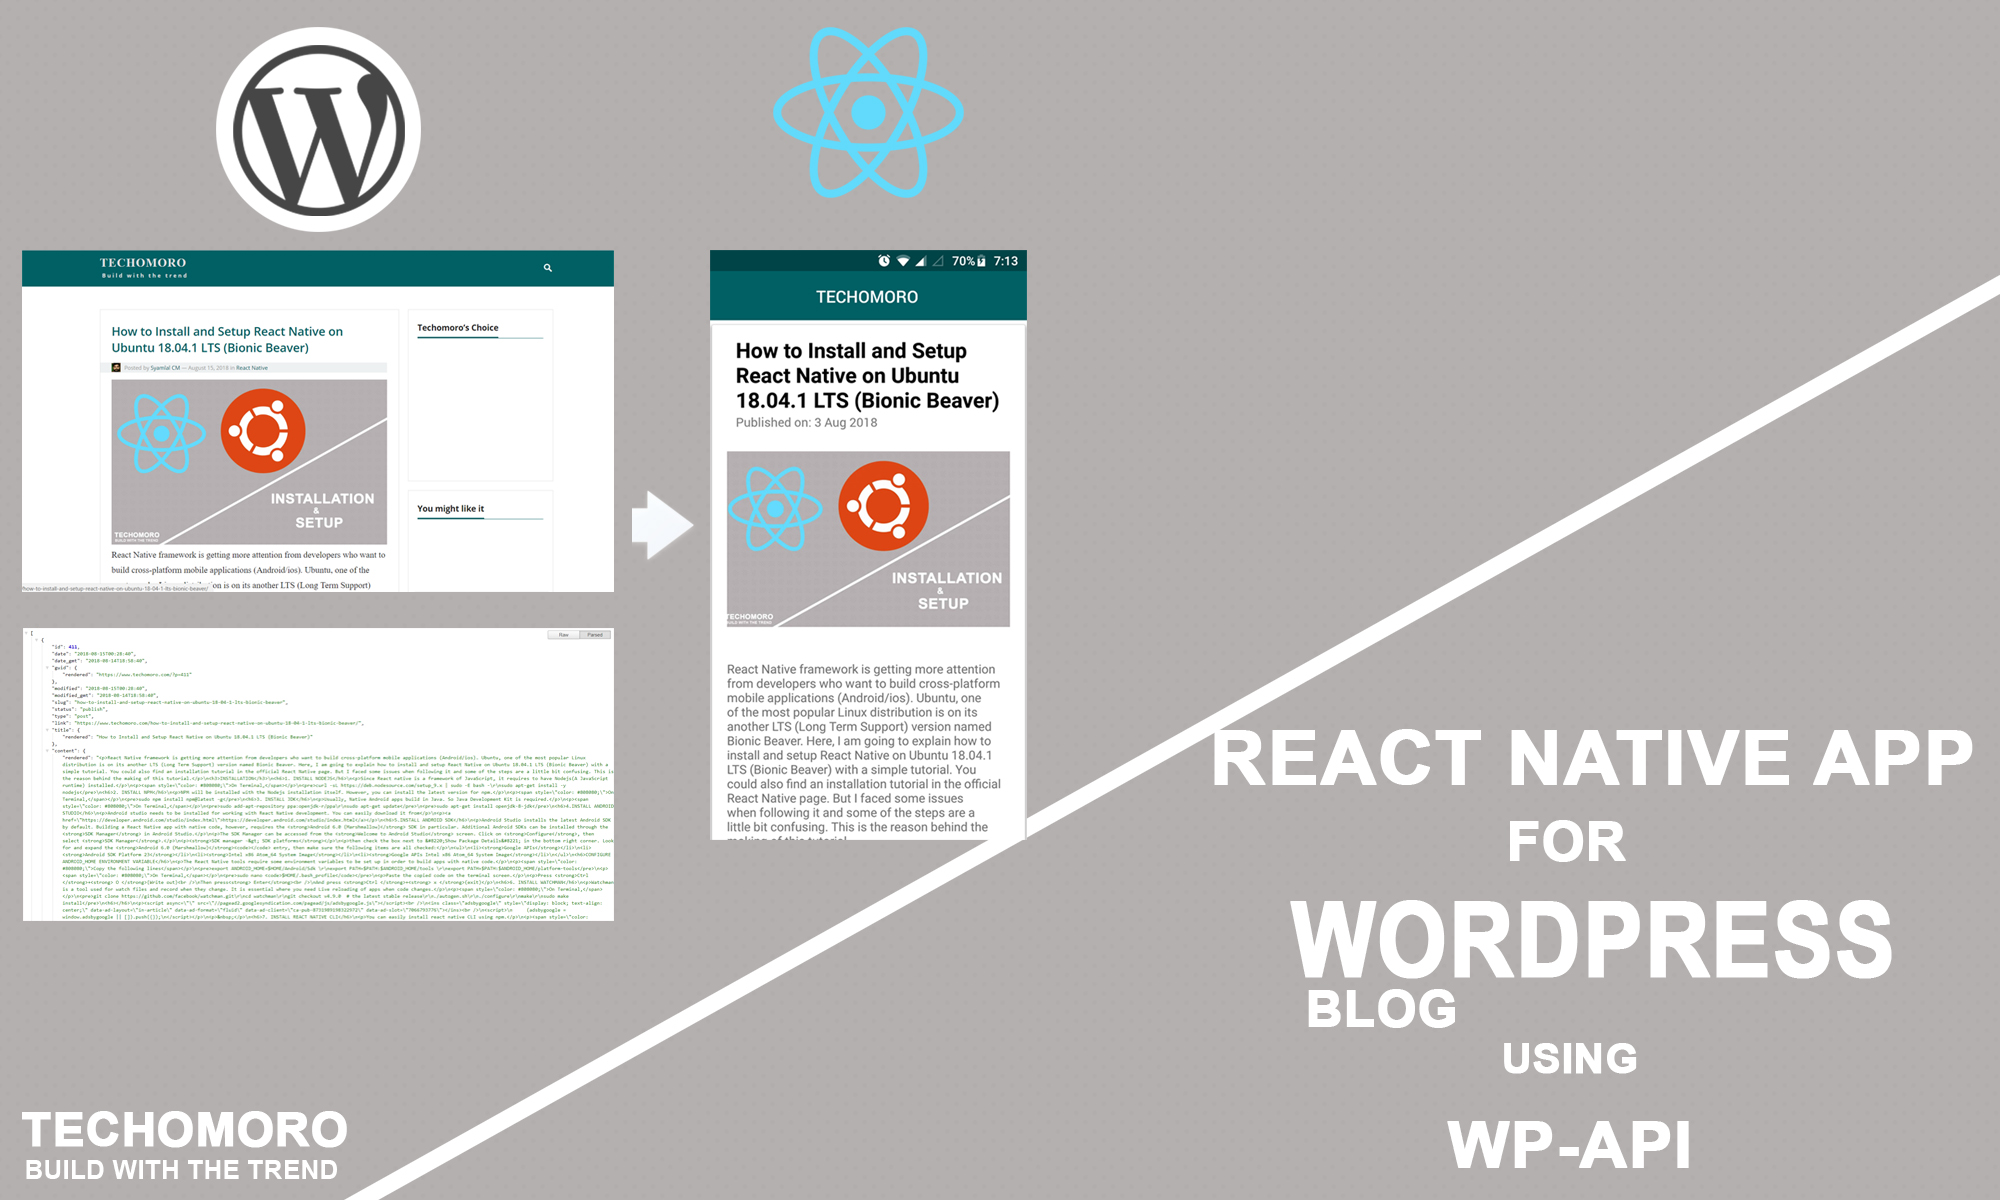
We all know that the popularity graph of PHP is going down nowadays comparing Python, Node.js, etc. Because of that, nowadays PHP is limited to WordPress mostly. But WordPress is a giant than we think. As we already know it is a free and open-source content management system based on PHP and MySQL. Here we are going to create a mobile app for our existing WordPress blog using React Native framework.
Before directly entering to the app development, let’s learn a bit about WordPress and React Native.
Why WordPress?
Its Features include a plugin architecture and a template system. Thousands of themes and plugins are ready to help you in developing a blog in WordPress. So, it only takes an hour to completely set up a blog using WordPress technology. Here I am going to create a mobile application using React Native framework for an existing WordPress blog using WP-API (WordPress-API).
Why React Native?
I choose to React Native to build a mobile application because it is one of the powerful and popular mobile application development frameworks. It letting us compose a rich mobile UI from declarative components. The advantage of choosing React Native for mobile application development is that it lets us build mobile applications using only JavaScript.
We are using WordPress REST API or WP-API
In this tutorial, I am using the WP-API of my blog which is made using WordPress. If you own a blog, you can use the API of it. I have shown the WP-API of my blog below. This only returns the post data.
You can also get Author, Media, Categories, etc by changing the posts part in the URL. But _embed part embedded all these data with the current collection of data.
https://www.techomoro.com/wp-json/wp/v2/posts?_embed
Create a React Native app for our WordPress Blog
Let’s start creating a mobile app for our WordPress blog using React Native framework.
1. Install and Set up React Native
I already made a tutorial to install and set up React Native on Ubuntu and Windows 10. Note that you have to change the project name AwesomeProject to ReactnativeWordpress (Step 9). Because in this tutorial, I am using that name. But as I told you, It is not mandatory for you to follow my naming systems. You can choose your own. In that case, you have to use them in the upcoming steps too.
2. Install Nativebase
Nativebase is a node package which allows you to use some UI components for React Native. If you can build your UI components using Flexbox, or you are using any other packages to setup UI, then this step is not mandatory for you. To install Nativebase inside your project, run the below command from the root folder of your project.
npm install native-base --save
react-native link
3. Install React-native-render-html
React-native-render-html is an iOS/Android pure javascript react-native component that renders your HTML into 100% native views. It’s made to be extremely customizable and easy to use and aims at being able to render anything you throw at it. We are installing this package because of the post contents from our WP-API will be in the form of HTML. But React Native only supports the native components. This package converts the HTML tags to Native views for ReactNative. This can be installed by running the below command from the root folder of your project.
npm install react-native-render-html --save
react-native link
4. Install Moment
Now, this library may be heard by you once since it is the most using lightweight JavaScript date library for parsing, validating, manipulating, and formatting dates. We are using this library to parse the posted date field in WP-API in a human-readable form. This can be installed by running the below command from the root folder of your project.
npm install moment --save
react-native link
It doesn’t need to run react-native link always after installing a package. But you have to run it after installing all the packages for your project.
So we installed all the packages required for our project. Now, we are going to start coding. Working of the ReactNative framework will start from index.js file always which is located in the root directory. In the index.js file, you can see that a component named App has been imported first from App.js. So the code inside App.js will be executed as default in ReactNative. We are going to code inside this file.
5. Import Components and Packages
We have to import default React components and the packages we installed to App.js first.
import React, { Component } from 'react';
import { Image, Dimensions, View, ActivityIndicator } from 'react-native';
import { Container, Header, Body, Title, Content, Card, CardItem, Text, Button, Left } from 'native-base';
import Moment from 'moment';
import HTML from 'react-native-render-html';
The usage of these components and packages will be explained by me later.
6. Declare a Class
Now add a class named App and export it.
export default class App extends Component {
}
7. Declare all States
Inside this class, we first need to declare a constructor and the states needed to store the API data (Posts data).
constructor(props) {
super(props);
this.state= {
posts: [],
};
}
8. Declare componentDidMount
componentDidMount() is a function which executes immediately after loading the component. So in our case, this function is invoked immediately after loading App component.
https://www.techomoro.com/wp-json/wp/v2/posts?_embed will return all the posts on the blog https://www.techomoro.com as JSON API format.
If you have a blog made in WordPress, you can easily get the JSON form of all the posts by concatenating /wp-json/wp/v2/posts?_embed with the domain name.
Since I added _embed at the end of the URL, it returns the API with Author data, Media data embedded with it. It reduces the number of APIs to be called.
The below code will fetch the WP-API and stores it in the state posts as an array. I also added a state isLoading to show an activity indicator before the API data is fetched.
The state isLoading will be true as default and after fetching the API, it changes to false. This will toggle the views and will be explained by me later.
componentDidMount() {
fetch(`https://www.techomoro.com/wp-json/wp/v2/posts?_embed`)
.then((response) => response.json())
.then((responseJson) => {
this.setState({
isLoading:false,
posts:responseJson,
})
})
.catch((error) => {
console.error(error);
});

}
9. Render()
Now it’s time for the render function which renders the view of our mobile app. I just used Nativebase UI components for easiness. You can use UI components from react-native if you need.
render() {
}
The UI components that we see on the mobile screen is the one returned by the render() function. So we have to declare a render() function and inside it, I am returning an Activity Indicator if the state isLoading is true. This means the WP-API is not fetched by our app yet.
if (this.state.isLoading==true) {
return(
<Viewstyle={{ flex:1, flexDirection:'column', justifyContent:'center', alignItems:'center',}}>
<ActivityIndicatorsize="large"color="#1C97F7"/>
</View>
)}
After loading the API data to posts state, the isLoading state will be changed false and the code below will be executed.
else{

Moment.locale('en');

return (
<Container>

<Header androidStatusBarColor="#004447"style={{ backgroundColor:'#006064' }}>
<Bodystyle={{ flex:1, flexDirection:'column', justifyContent:'center', alignItems:'center', }}>
<Title>TECHOMORO</Title>
</Body>
</Header>

<Content>

{this.state.posts.map((item, index) => (
<Card style={{flex:0}}key = {item.id}>

<CardItem>
<Left>
<Body>
<Text style = {{ fontSize:24, fontWeight:'bold' }}>{item.title.rendered}</Text>
<Text note>Published on: {Moment(item.date).format('d MMM Y')}</Text>
</Body>
</Left>
</CardItem>

<CardItem>
{item._embedded['wp:featuredmedia'].filter( element=>element.id == item.featured_media).map((subitem, index) => (
<Image source={{uri:subitem.media_details.sizes.medium.source_url}}style={{height:200, width:200, flex:1}}key = {item.id}/>
))}
</CardItem>

<CardItem>
<HTML html={item.content.rendered}imagesMaxWidth={Dimensions.get('window').width}/>
</CardItem>

<CardItem>
<Left>
<Button transparenttextStyle={{color:'#87838B'}}>
<Text>Author:</Text>
{item._embedded.author.filter( element=>element.id ==item.author).map((subitem, index) => (
<Textkey = {item.id}>{subitem.name}</Text>
))}
</Button>
</Left>
</CardItem>

</Card>
))}

</Content>
</Container>
)}
I added some line spaces in between the codes just to make this code more understandable for you when I am explaining it. Let us start.
Moment.locale(‘en’) just change the Published Date language to English since it supports multiple languages. There is nothing else with it.
Now there is a Header section which also doesn’t have much role in this tutorial. It displays a header on the top of the app with a title TECHOMORO.
We need to closely look at the Content section.
this.state.posts.map((item, index) will map throughout the posts array which contains the post data from our WP-API and each item (post) will be shown as Cards. So a card represents a post.
In each Card, there is four CardItems or sections. the top will display the title and posted date, the other one display featured image, next section displays the post content and the last one shows the Author name.
I am going to explain each CardItems from top to bottom for easiness. Since we already mapped through posts array and have each post in the item,
CardItem 1
item.title.rendered will contain the title of each post. This will be shown directly.
The item.date will contain the date posted but the format is tough by the human to read. SO I used Moment package to make the date easier to read.
Moment(item.date).format(‘d MMM Y’)
CardItem 2
Now it’s a tricky part. We need the featured image of each post. But WordPress stores the featured images in separate databases. But we already got them using _embed.
So I iterated through the embedded collection using the featured image id.
item._embedded[‘wp:featuredmedia’].filter( element=>element.id == item.featured_media).map((subitem, index)
Now the URL of each featured image will be in subitem.media_details.sizes.medium.source_url. I just gave it to image component.
CardItem 3
Now the next section will show the contents of the post as native components instead of HTML. We don’t have to worry about it since react-native-render-html take care of it.
item.content.rendered will contain HTML tags and react-native-render-html package converts it to native components.
CardItem 4
Now as the same as finding the featured image URL, the Author’s name is fine by using the Author’s id in the post.
————————————–
You can also add an icon to your app by referring the below link (optional).
https://www.techomoro.com/how-to-add-app-icon-to-react-native-android-app/
Also, generate a signed apk for your app (optional).
https://www.techomoro.com/how-to-generate-signed-apk-in-react-native/
GitHub
The complete project I created is uploaded in GitHub and you can always refer it.
https://github.com/syamjayaraj/ReactnativeWordpress
Summary
Here we discussed the steps to create a React Native app for our WordPress blog using WP-API.

Very interresting post, thank
Hi, Great tutorial – really, really helpful! One question.. is it possible to update your code to have it not break the app if no featured image is listed? Like maybe have it default to a local image if no image is there? Thanks
very cool, how would we open a post in a new screen or modal for example?
It’s amazing, Thank you so much for gathering all this information in one post, it will be extremely helpful for all people who work on React technology.
Good Post and informative. Thank you so much for sharing this good post, it was so good to read and useful to improve my knowledge as an updated one, keep blogging.
This is great! The explanation you are providing here is very detailed and easy to understand. Thank you!