
We know that the Next.js is framework is way better than the React.js library. As a full-stack framework, Next.js can handle both frontend and backend. We can create API routes and connect databases to our app. Here we will discuss the method to connect multiple MongoDB databases in a Next.js app.
Prerequisites
This article is considered as the continuation of my previous article about connecting a MongoDB database with a Next.js app. You have to refer to it for a better understanding. The URL to the article is given below.
How to Connect MongoDB Atlas with a Next.js App.
What we will learn
After referring to my previous article, you will get a better understanding of connecting a MongoDB Atlas with a Next.js app.
Other than this, completion of this article will give you an idea of connecting multiple databases in a single Next.js app.
- We will create two databases in MongoDB Atlas
- List the data in each database on our Next.js app.
After completing this article, we will create an article showing list of users from two databases. It will be like below.

Create two databases in MongoDB Atlas
We converted all the steps to create databases and collections in the previous article with screenshots. Refer to it and create two databases in MongoDB Atlas.
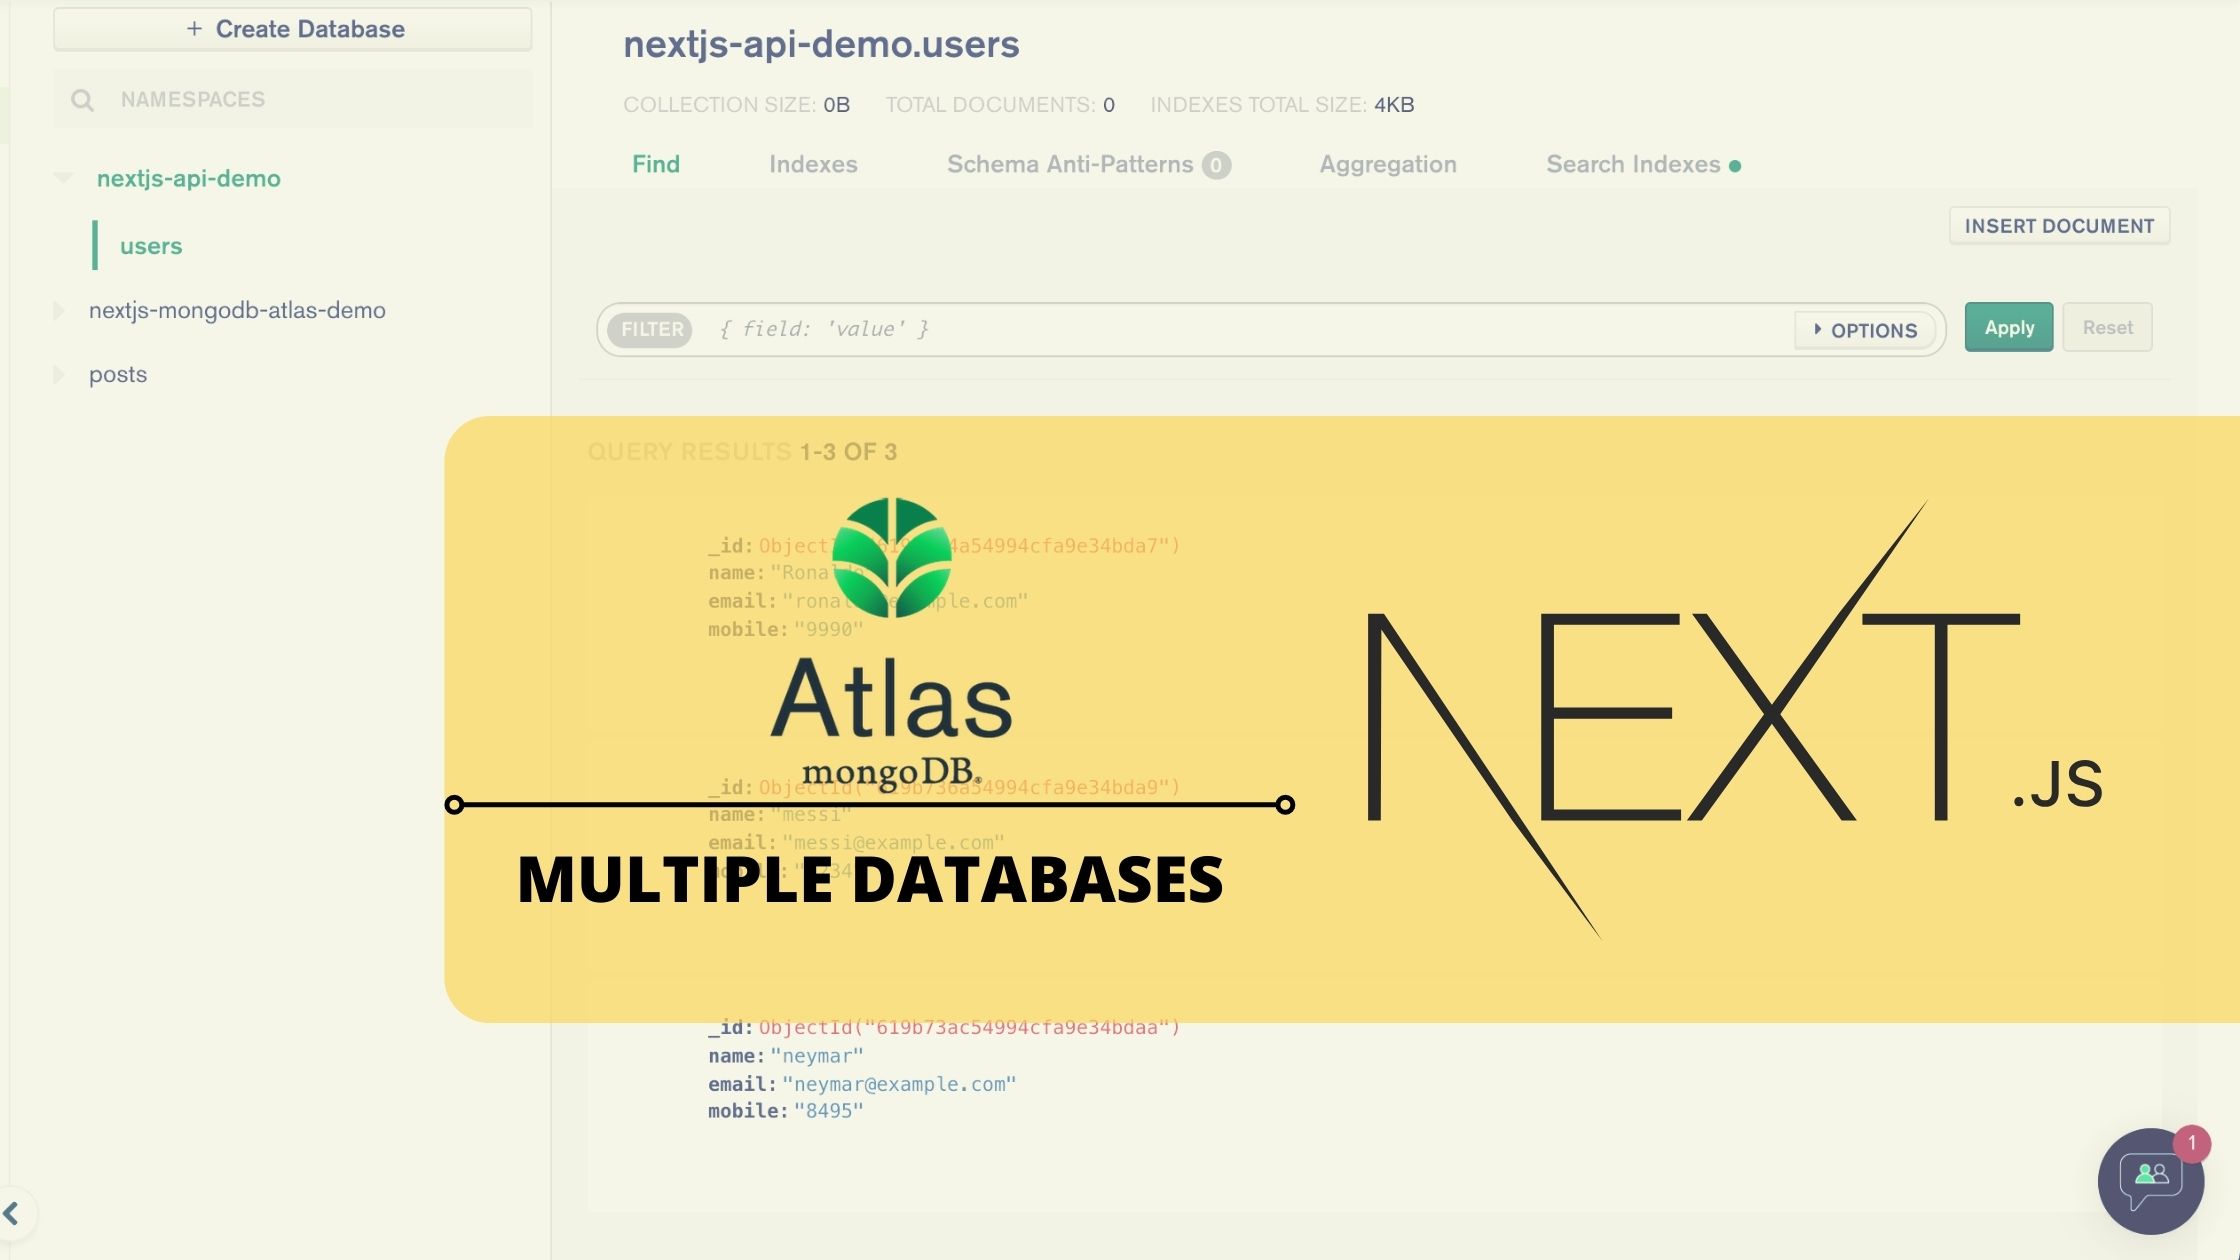
Here, I am giving a screenshot of two databases created in MongoDB Atlas.

The database names are nextjs-mongodb-atlas-demo and nextjs-api-demo. The two databases contain the collection users with some dummy data.
We will connect these two databases in our Next.js app and display the two lists of users.
Create a new Next.js project
After successfully installing Node.js on our system, we can create a new Next.js project using the command below. After creating the project, enter the project directory and open it with VS code.
npx create-next-app nextjs-multiple-mongodb-databases

cd nextjs-multiple-mongodb-databases

code.
Setup a local environment variable
After creating the database and collections, we will get a connection string from MongoDB Atlas. You need to refer to the previous article for further details.
Now, add the copied connection string from MongoDB Atlas. It should something like the one below.
MONGODB_URI= "mongodb+srv://techomoro123:[email protected]?retryWrites=true&w=majority"
Here, techomoro123 is the username and qk7ap0dFcwvYdo12 is the password. You have to replace it with yours.
Create a file named .env.local in our project and copy the contents to it.
MONGODB_URI= "mongodb+srv://techomoro123:[email protected]?retryWrites=true&w=majority"Note that we don’t specify the database name here. Because we will connect the database later.
Install MongoDB
We need to install the MongoDB package to work with MongoDB in a Next.js app. I think version 3.5.9 is more compatible. So we can install it.
npm i [email protected]Setup a MongoDB connection
Create a file named mongodb.js inside the lib directory. and add the code below to create a connection from our Next.js app to our MongoDB.
Note that we do not specify the database name here also. Because we will do it later.
import { MongoClient } from 'mongodb'

const uri = process.env.MONGODB_URI
const options = {
  useUnifiedTopology: true,
  useNewUrlParser: true,
}

let client
let clientPromise

if (!process.env.MONGODB_URI) {
  throw new Error('Please add your Mongo URI to .env.local')
}

if (process.env.NODE_ENV === 'development') {
  // In development mode, use a global variable so that the value
  // is preserved across module reloads caused by HMR (Hot Module Replacement).
  if (!global._mongoClientPromise) {
    client = new MongoClient(uri, options)
    global._mongoClientPromise = client.connect()
  }
  clientPromise = global._mongoClientPromise
} else {
  // In production mode, it's best to not use a global variable.
  client = new MongoClient(uri, options)
  clientPromise = client.connect()
}

// Export a module-scoped MongoClient promise. By doing this in a
// separate module, the client can be shared across functions.
export default clientPromise
Create an API route to get the list of users from database 1
We need to create two API routes to get the list of users from database 1 and database 2.
Choosing the database is done by the below code.
const db1 = client.db("nextjs-api-demo");So inside the directory pages/api/users, create a file named one.js and connect with database 1 and get the user’s list.
import clientPromise from "../../../lib/mongodb";

export default async function handler(req, res) {
  const client = await clientPromise;

  const db1 = client.db("nextjs-api-demo");
  switch (req.method) {
    case "GET":
      const users1 = await db1.collection("users").find({}).toArray();
      res.json(users1);
      break;
  }
}
Create an API route to get the list of users from database 2
In the same manner, discussed above, create a two.js file to connect with database 2 and list all users.
Here also the database is chosen with the below code.
const db2 = client.db("nextjs-mongodb-atlas-demo");So that the entire two.js file will be the same as below.
import clientPromise from "../../../lib/mongodb";

export default async function handler(req, res) {
  const client = await clientPromise;

  const db2 = client.db("nextjs-mongodb-atlas-demo");
  switch (req.method) {
    case "GET":
      const users2 = await db2.collection("users").find({}).toArray();
      res.json(users2);
      break;
  }
}
Call the API routes inside getStaticProps
So our two API endpoints are ready and we can call these APIs to get the list of users from database 1 and database 2.
I am calling the API requests inside the getServerSideProps lifecycle method. We can also call these APIs from getServerSideProps or even from inside a useEffect function.
export async function getStaticProps(context) {
  let res1 = await fetch("http://localhost:3000/api/users/one", {
    method: "GET",
    headers: {
      "Content-Type": "application/json",
    },
  });
  let users1 = await res1.json();

  let res2 = await fetch("http://localhost:3000/api/users/two", {
    method: "GET",
    headers: {
      "Content-Type": "application/json",
    },
  });
  let users2 = await res2.json();

  return {
    props: { users1, users2 },
  };
}
Now can show this list of users in our app. So that the entire index.js file will look the same as below.
export default function Home({ users1, users2 }) {
  return (
    <div className="container">
      <div className="left">
        <h1>Users 1 from DB 1</h1>
        {users1.map((user, index) => {
          return (
            <div className="card" key={index}>
              <h2>{user.name}</h2>
              <p>{user.email}</p>
              <p>{user.mobile}</p>
            </div>
          );
        })}
      </div>

      <div className="right">
        <h1>Users 2 from DB 2</h1>
        {users2.map((user, index) => {
          return (
            <div className="card" key={index}>
              <h2>{user.name}</h2>
              <p>{user.email}</p>
              <p>{user.mobile}</p>
            </div>
          );
        })}
      </div>
    </div>
  );
}

export async function getStaticProps(context) {
  let res1 = await fetch("http://localhost:3000/api/users/one", {
    method: "GET",
    headers: {
      "Content-Type": "application/json",
    },
  });
  let users1 = await res1.json();

  let res2 = await fetch("http://localhost:3000/api/users/two", {
    method: "GET",
    headers: {
      "Content-Type": "application/json",
    },
  });
  let users2 = await res2.json();

  return {
    props: { users1, users2 },
  };
}
Codesandbox
Refer to the CodeSandbox link to view the live app. You can clone this project to your CodeSandbox account and edit the code also.
https://codesandbox.io/s/sharp-grass-94n8o
GitHub
You can always refer to the GitHub repository to clone this project, refer to the code and work on top of it.
https://github.com/techomoro/nextjs-multiple-mongodb-databases
Summary
Here we have discussed the steps to connect multiple MongoDB databases in a Next.js app. This article may confuse some steps if you did not refer my previous article.


Be the first to reply